pinterest verification

Sunday, October 19, 2014

Christmas tree tutorial

Hi everyone!
How's your miniaturing going?)
I must say I'm a little bit dissapointed with ebay. I mean, I found there new owners for my roomboxes, but I didn't know the final value fee is 10%. That is a really huge fee, if you ask me.
On our Russian site that does the same thing that Etsy does - there's no individual fee at all. You just pay $2 once a month and sell whatever you want. I must say, I am shocked at this 10%..

But off with it. Today I wanted to start a small series of posts that will show you, how I do my tiny things. Perhaps someone will find it usefull. I am sorry for the quality of photos - I take them always under artificial light, so they doesn't really give true colors.

Anyway. This is how I do my chrismas trees:
 Step 1. harden the thread with PVA glue (white glue) It would be our stem.
 Step 2. glue it inside the bead on the toothpick.
 Step 3. Wrap the thread with glue around the bead - that would be our basket. Leave it to dry.
 Step 4. Tap it into white flock to make artificial snow. Or just paint the top white or brown :)
Step 5. Gently pull off the toothpick (I removed it, than placed it back just a bit, so that I could hold the tree.) Place the thread-stem inside the basket. Cut the moss to tiny pieces.
 Step 6. Glue the moss to the stem so it would look like a Xmas tree.
 I prefer to put it to place and only then -  add more brunches. This way you can glue them not only to stem, but to the walls.
And here's the finished look :)
And another example:

The roombox with yellow sofa you can find here on ebay
The next tuto would be about this particular yellow sofa :)
Hope it would be useful for anybody, happy crafting!

Thursday, October 9, 2014

A try on ebay

Hi everyone!
I decided to take this important step today: I've listed two of my new roomboxes on ebay. I have no idea, if they'd find their new owner there, but it surelly will be interesting to watch for me. Im quite excited :)
Here are my roomboxes:

As always, they are 144th scale (20x20x20 mm)
You can find more photos here, at my new shop: watermelon room and "Peace" room
Please, let me know, if the link opens incorrectly.
Wish me luck! :)

Sunday, August 24, 2014

Family house is done!

Hi guys! So glad to see you all on my page again!
I've finally finished this huge tiny house and I'm proud to show it to you. I have decided against etsy. My main reason was to make an auction, to see a real price that people would be willing to give me.. But there's no such thing on Etsy :( ebay also doesn't allow it's new members to set a price more than 500$ untill they prove to be trustworthy, so I had no choice other than to go back to my russian shop here:

livemaster.ru
Unfortunately it has no english version. Just in case any of you would be willing to buy the house - post me and we'll settle it just fine.

I know the price I'm setting is high (900$), but it really barely covers the amount of time spent on the house... So let's see weather the house will find it's new home :)

Anyway. Here it is, and I hope you like it!


 Best wishes
Daria

Wednesday, July 30, 2014

Roof and balcony

A lot of work - a little to say. Just more stones and tiles. And then some more. And some more :)
 Oh, if I only had an access to laser-cut parts, like hand rails and stuff! I wouldn't have to invent all this mess :)) But again - it's worth it - it is so unique - LOL :)


Perhaps any of you has the idea how could I make this blue button not so blue? I can't simply paint it with acrylics - it won't last while being used (

Wednesday, July 16, 2014

Painted stones

Finally! 3 days of "stonework" are over :)
Now it's time for making window frames and balcony
 If anyone knows jow to cut even tiny pieces (for stones, tiles etc) please share! because, even though unevenness is cute, I'd love to try more classical look someday :))
 I love how chmney looks. It's a really time consuming way, but it's worth it

Have you yourself tried tiny projects yet? :) I'd love to read about it :))

Monday, July 14, 2014

chimney

I've spent today making chimney for my house. Here's how I do that:
 I took some air drying clay, rolled it til it became really flat. Then let it dry.
 I cut one strip and then cut it to tiny pieces. They resemble bricks.
I glue them to place one by one. Isn't they look great? I think they're very reaistic. I'll paint them later with watercoors - La Doll (the clay I use) looks very nice painted with watercolors.

I hope that helps someone who's looking for a way to make chimney from scratch :)

Wednesday, July 9, 2014

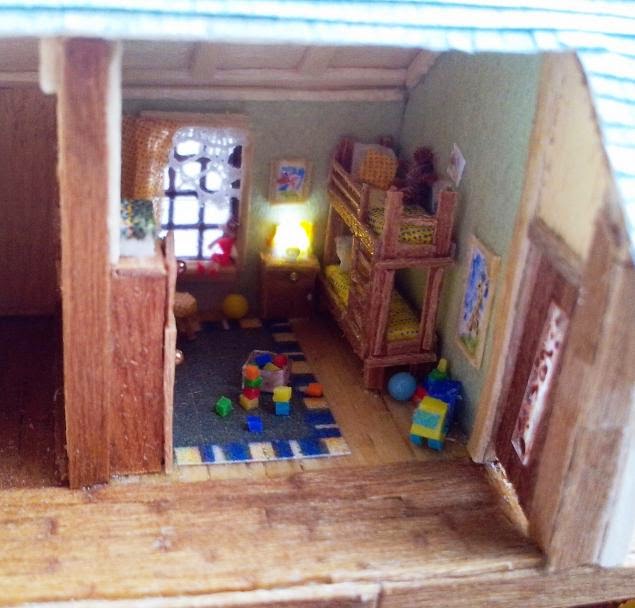
kids room - last room!

Thanks for your comments, guys! They're always appreciated :) Here's kids room - and with that the inside is DONE!)
I know, that there's so much more you can place in the kids room, but this particular one appeared to be so tiny even if you scale it up to normal that I had to place only few items indicating kids.
 I'll need to re-do the cabinet - the gap attracts too much attention on photos


 Today is the day when I'm alone at home for about 5 hours!! (The older daughter is in the camp and the younger - by granny) - There's so much work to do for me! :)
I started the stones on the outside (I have glued all the walls with paper napkins so that the wooden texture won't be visible after they got painted)